Everything You Need to Know About Translation Keys
When you localize software, you need to create a version for each market. If you hardcode all the translated content and switch it out every time you update the software, it would take a lot of time and effort. Not to mention, making even the smallest changes could turn into a nightmare.
Thankfully, you don’t have to worry about this. Translation keys are the building blocks of any software localization project. They can help you scale up your localization effort so you can launch and maintain your software in the global market with ease.
Find out what translation keys are and how to name, organize, and manage them efficiently to streamline your localization projects.

What Are Translation Keys and How Do They Work?
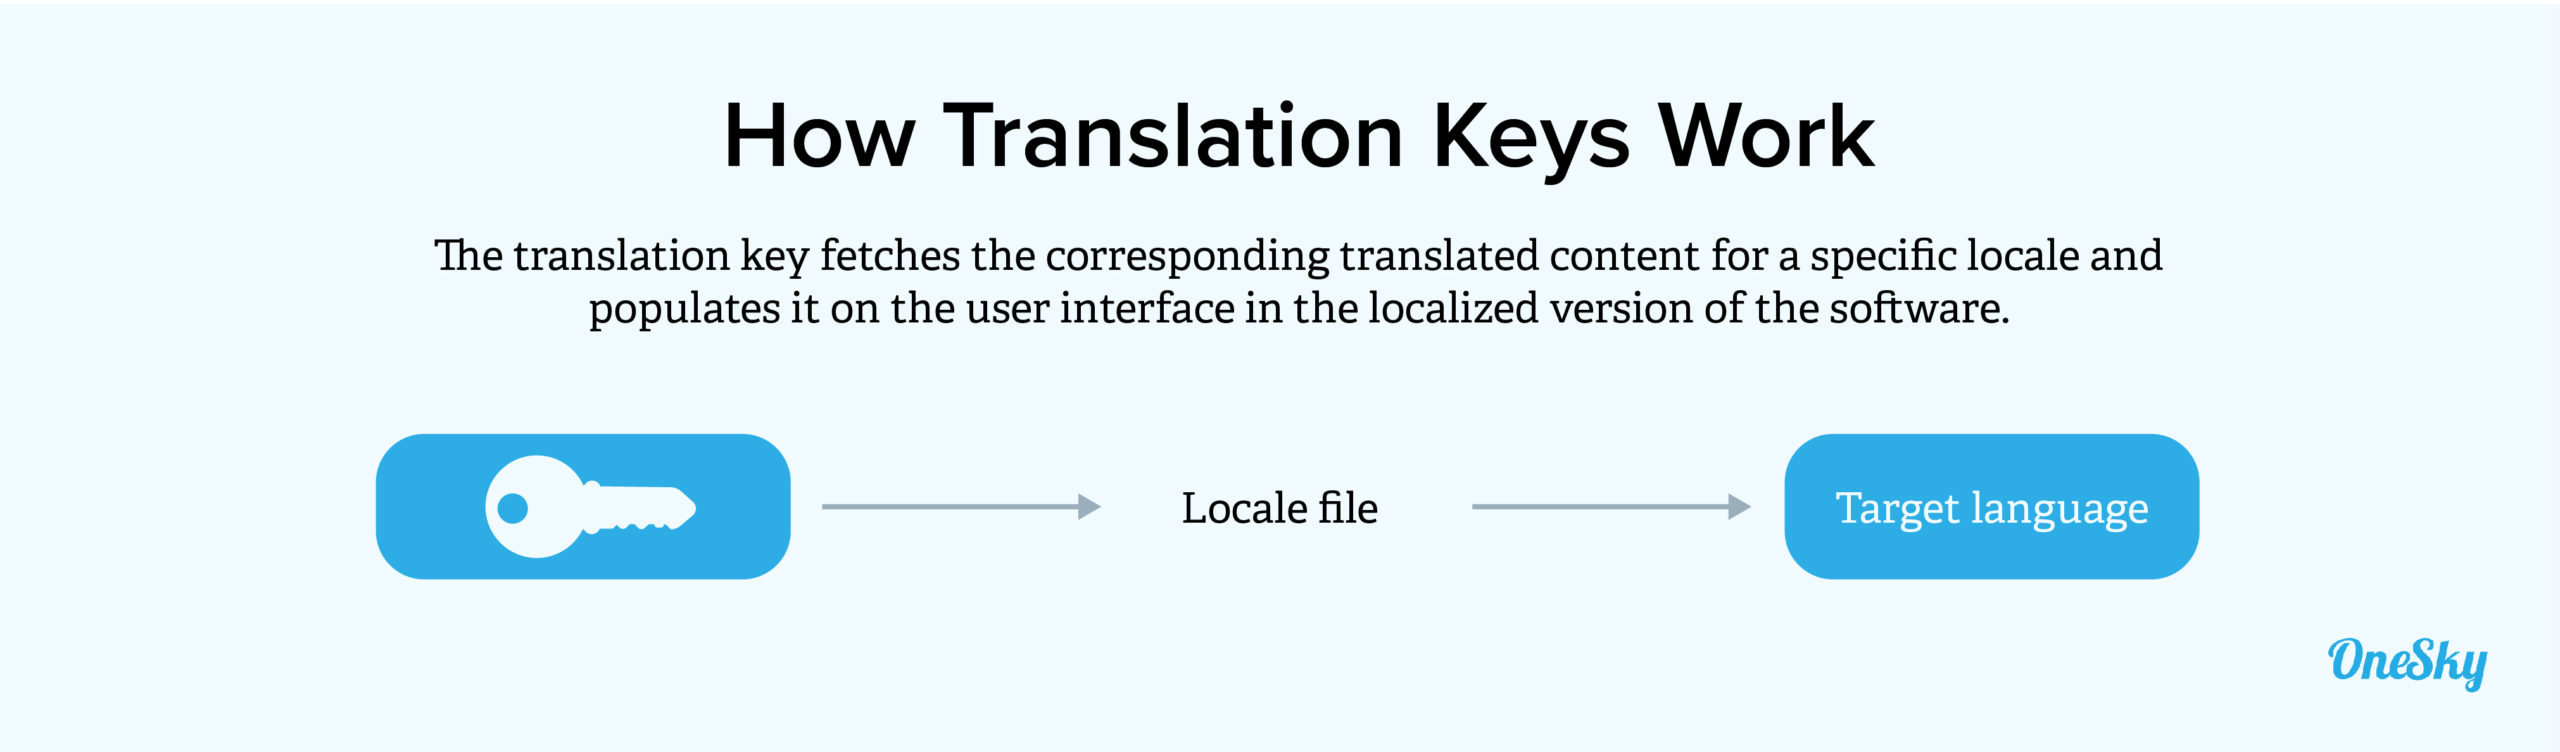
Translation keys are a critical component of the internationalization (i18n) process. They act as IDs that reference pieces of displayable text, allowing strings that require translation to be easily swapped out based on locale instead of being hardcoded into the software.
A translation key indicates where a string appears on the user interface (UI) and has a corresponding value for each target language. Meanwhile, the translated content is stored in individual locale files, each of them matching a value in a translation key. A localized version of the software then pulls the appropriate translations from the locale file and populates the content in the UI.
How To Name and Organize Your Translation Keys
You’ll need to handle many translation keys in a software localization project. Compound the sheer number of keys with the complexity of the workflow, and things can get confusing quickly if you don’t have a systematic way to organize the translation keys. Here are some best practices to follow.
Develop a Naming Scheme
Effective translation key organization starts with naming. Every developer working on the project should follow the same logic. Develop and document a naming convention and make sure everyone on your team is on the same page.
Regardless of the naming scheme, use meaningful and descriptive names at all times. A key’s name should sum up the purpose of the string and what value it holds. It should be self-explanatory but not overly specific such that a change in a key’s value would require an update of the name — which requires you to find and swap out all usages in the code.
Use a Single Source Language
The identifiers in your translation keys should be in the same language as the source language to keep them readable and eliminate inconsistencies in the codebase. Additionally, follow this best practice for characters that can be interpreted as operators, such as single quotes, double quotes, or escape characters.
Apply Namespaces Strategically
You can nest translation keys under different namespaces (e.g., based on sections in the software) to avoid name clashes. Meanwhile, the visual hierarchy can help developers easily identify them in the codebase. However, don’t overuse namespaces, or you could create an overly complex structure.
You can also use a global namespace for persistent elements that appear in multiple parts of the UI (e.g., “save,” “next”) so you don’t have to create duplicate entries that could make maintenance and updates more complex and confusing.
Minimize Translation Key Duplication
Having fewer keys can save you translation time and effort. You can manually remove all duplicate translation keys and replace them with a single key or use a script to automate this process. You can also solve this problem by using a global namespace.
However, don’t overgeneralize since the same word could be translated differently in various target languages depending on context. Review all the usage to ensure that you aren’t impacting the user experience as you attempt to streamline the development process.
Stay Organized As You Grow
The number of translation keys will likely increase over time. Stay organized by storing localized content for different locales in separate files and putting these files into clearly-labeled folders (e.g., English, German, French, etc.) You can also categorize translations based on function or scope.
Keep your translation files clean by removing orphan keys that aren’t used anymore. For example, when you eliminate all instances of a key from the codebase, delete it from your translation files as well.
Set a Solid Foundation For Your Localization Project
There’s no one-size-fits-all approach to defining translation keys. Make the decision based on various factors, such as project size, update frequency, and your team’s preferences.
Regardless of your approach, one thing is for sure: Trying to handle translation keys manually is a fool’s errand.
Use a robust localization management platform to manage translation keys properly. For example, it can help you match keys and strings correctly and efficiently, which is critical in the software development process.
The platform will display keys to the translators and provide contextual information to ensure high-quality and accurate translations. It can also help you search keys and group strings by key patterns to stay organized.
Onesky is an end-to-end localization platform that can help you manage your translation keys to support a cost-effective process. You can store all the relevant information and localization assets at a centralized location to facilitate seamless collaboration among team members.
You can also access all the necessary tools you need for localizing software, apps, websites, and games. These include a translation management system (TMS), string context, workflow automation, translation memory, QA checks, and more.
Try Onesky for free and see how we can help you streamline software localization.

 Written by -
 Written by


 Written by