
Are you an iOS developer, too? Check out our coverage of this year’s Apple WWDC Developers Conference here. We’ll be back next week with more from Google’s developers team on the most exciting markets you should localize to, and how you should do it. Subscribe to our Localization Newsletter and be the first to know when we publish!
Highlights from Google I/O 2017
Earlier this May, thousands of developers flocked to Mountain View, California for Google I/O 2017, the company’s annual developers conference. It’s one of the most anticipated events of the year for the tech community. Similar to other major developers conferences (like Apple’s WWDC, for example), the 3 days saw its fair share of product launches, feature updates, and sneak peeks at the latest technology Google’s working on.
Here are some highlights from this year’s announcements:
- Google hits 2 billion active monthly devices running Android worldwide.
- Big push for AI in many of their products, including automated “visual” translations through Google Lens on mobile coupled with Google Assistant and Google Translate.
- Hardware updates, especially a game-changing AI chip, Google Home acting as a phone, and a preview of a standalone VR headset.
Localization Remains A Top Priority For Google
As a company dedicated to the mission of making the world’s information “universally accessible and useful,” Google is committed to giving developers internationalization tools to reach their global audience, no matter the language.
Google’s “Next Billion Users” initiative focuses on getting users online in emerging markets through Google’s smartphone technology. This means localizing their own products for these markets technically and culturally—as well as helping their clients do the same. Many of the localization updates from I/O 2017 center on tools for building light-weight mobile experiences for developing markets, such as India, Brazil, and Indonesia, where range of devices is limited, connectivity is low, and data is expensive.

If you’re interested in learning more about the technical side of Android localization, be sure to check out our Localization Academy, which will guide you through the whole process of localizing your iOS and Android apps, with sample codes included.
Now let’s dive into the top updates for localization from Google I/O 2017!
1. Building Leaner, Faster Mobile Experiences
Android Studio 3.0 Canary was debuted at I/O ’17. This latest version emphasizes “speed and smarts.” It offers support for developing apps more efficiently, and enables development for Instant Apps, which would be more accessible to global emerging markets that have low or intermittent connectivity. (More on Instant Apps later.)
The latest version of Android O mobile OS, as previewed at the conference, has been optimized to run smoothly on entry-level devices found frequently in emerging markets. This means optimized battery life, startup time, graphic rendering—making it a generally more stable experience. (Google is also working to design their own suite of apps using less memory, storage, and data—often barriers to mobile in these markets—and encourages developers to do the same for their apps—see “PWAs” below.)
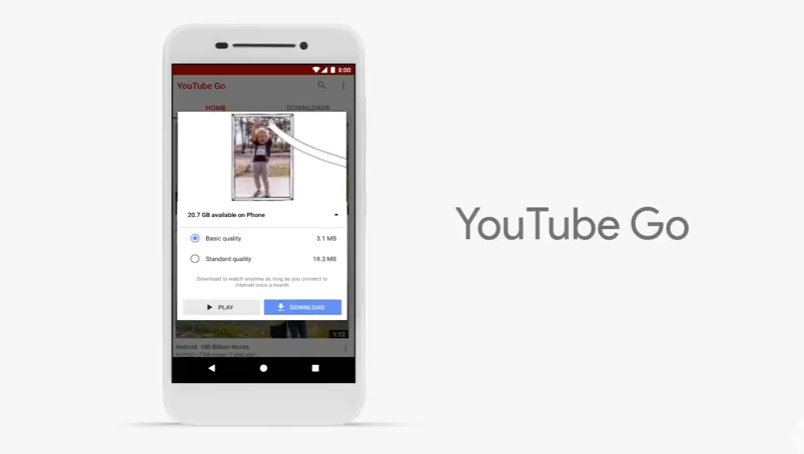
Android Go, a lightweight version of Android O, was officially announced in the Keynote as well. A successor of the Android One initiative from a few years ago, Android Go is Google’s latest effort to bring cost-effective Android smartphones to emerging markets. It’s designed to run on smartphones with 1 GB, or even 512 MB of RAM, and will feature a suite of lighter Google apps both in the platform (like YouTube Go above) and in the Play Store that run on less data and battery. (No word yet on accompanying hardware, but Google’s hoping to launch Android Go in 2018.)
2. No Installation? No Problem
Android Instant Apps are now open to all developers. These are apps meant to look and feel like a native app—without requiring installation, which can be costly and time-consuming for markets with poor or intermittent connectivity. They also minimize data usage and can work offline when pre-loaded.

3. All About Mobile Web
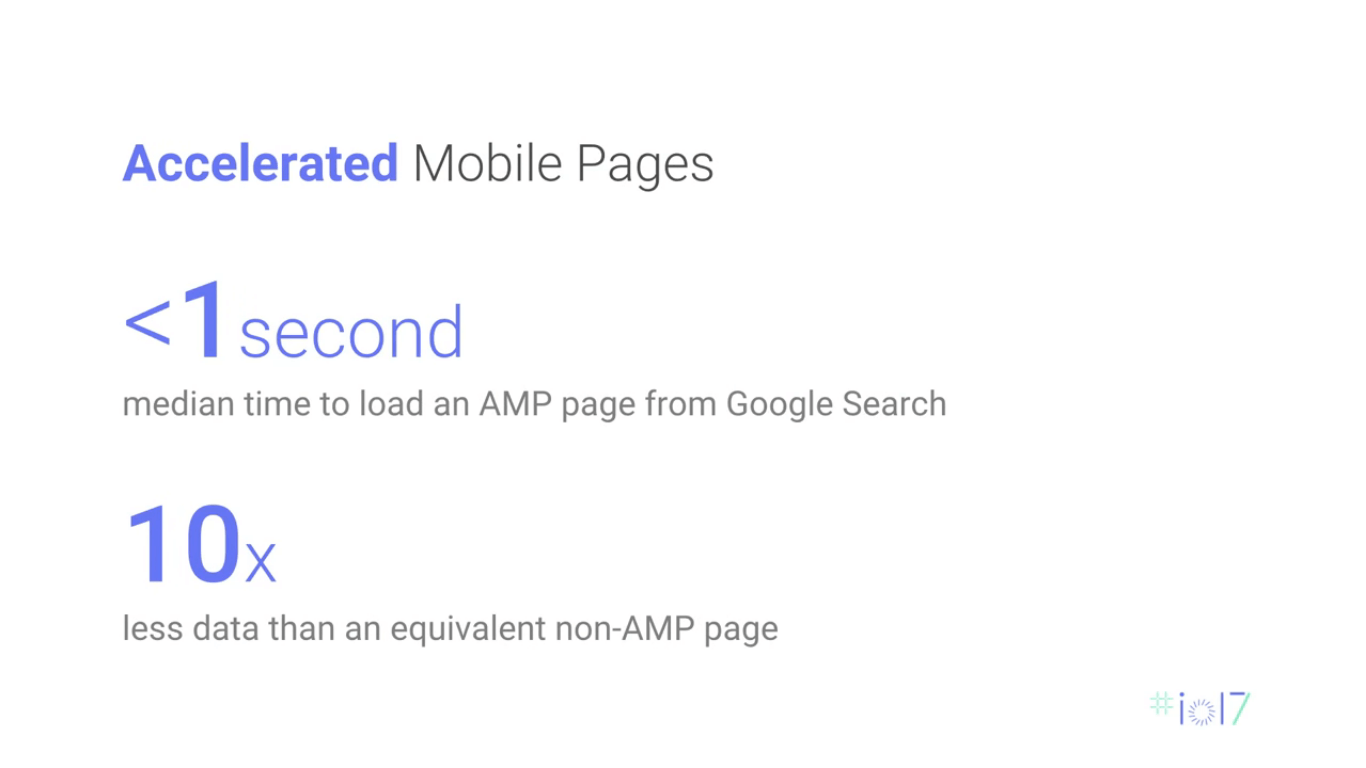
There was a lot of hype about Google’s Accelerated Mobile Pages (AMPs) and Progressive Web Apps (PWAs) at last year’s I/O. They were again a focal point for this year’s localization updates. These are intended to be fast, lean, and reliable web experiences that promise to increase engagement in developing countries—and judging by the success stories, they’re hitting the mark.
4. Play Console Updates
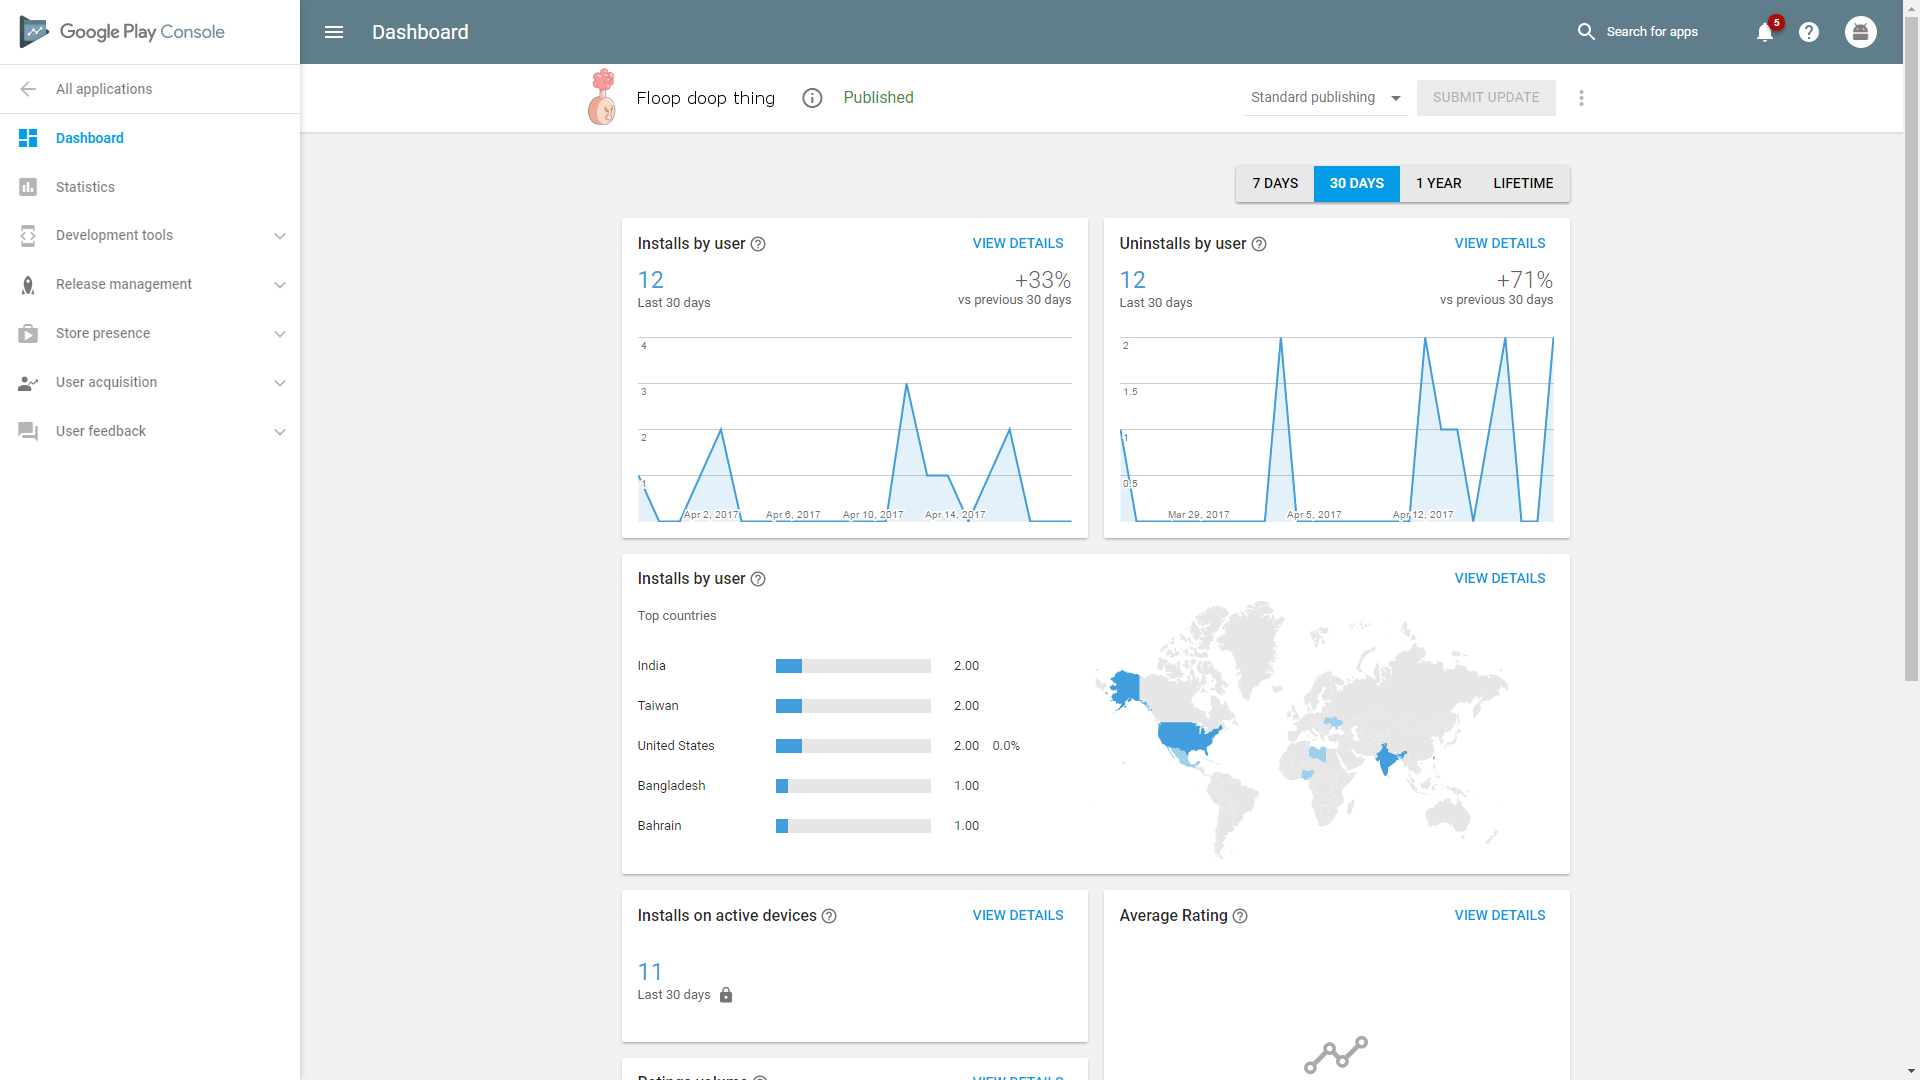
Several new updates in the Play Console will make it easier to build for an international audience and keep track of your ROI across markets, including features and reporting on app performance, release management, and targeting a global audience. The analytics will contain pre-launch reporting and user acquisition analysis across different geographies—particularly powerful if you’re coordinating a multi-market launch for your localized product.
Your App Should Be Global
Check back next week for our coverage of Google’s tactics for localizing to emerging markets, with some examples of how they’ve localized their own products. (Subscribe here so you don’t miss the update!)
If you’re interested in the big picture of localization—from choosing the languages to marketing the finished product—download our step-by-step eBook, The Essential Guide to App Localization.
Thank you for reading, and happy coding!
About OneSky
Thank u so much for an update.
Mobile app development companies in Coimbatore
Good information you had shared.Thank you!
AI Development companies in Coimbatore
Blockchain Development Companies & App Developers in India
best leading Cloud Computing & Cloud Hosting Service Providers